How To Make Great Home Made Sausages
The team at Airborne Magazine obtained consent of Luvele.com.au for the republishing of this really great article on how to make sausages at home!
We know our readers will like it and there is some great advice throughout the article. Enjoy!
YOU DON’T NEED TO BE AN EXPERT!
Now, I love a good sausage but I’m often afraid to think about what is really inside. Before refrigeration, sausages were a great example of ‘waste-not-want-not’ nose-to-tail eating. They would include left-over meat, organs and even blood all packaged up with salt and spices for later cooking. The neat, squishy bundle was typically then left to cure and self-preserve.
Now some of you may find the idea of offal simply awful, but what really scares me is the range of additives and fillers that can be stuffed into supermarket mystery bags these days. Price is often the indicator of quality and at the cheaper end you will find numbers, unrecognizable or unpronounceable ingredients and a lot of cereal grain lurking inside rather than simply meat and spices.
When I started on the specific carbohydrate diet (and later the GAPS diet) several years ago, sausages were obviously completely off my shopping list. Once I got my hands on a Luvele meat grinder with sausage making attachment though, I could start making sausages at home. Now, sausage making afternoons have become a fun family activity. Making sausages from scratch, has put me back in control and has taken the ‘mystery’ out of the mystery bag. I’ve replaced ‘mystery’ with creativity. Beyond some very basic sausage making ‘rules’, the flavoursome ingredients in a sausage are limited only by my imagination!
Good sausage is all about balance. Balance of salt, meat and fat, plus the balance of spices and herbs so that they are not bland or overpowering. Keeping a good ratio of salt to meat (and fat) is essential, and this might take some batches before you perfect it. Everyone has different preferences of course; I personally prefer snags that are not too salty.
You don’t need to be an expert to turn out professional sausages at home. All you need is the Luvele designed stainless steel sausage nozzle, meat grinder attachment, a flair for experimentation and a few helpful tips.
WHAT YOU NEED
- Luvele ultimate electric meat grinder & sausage maker
- Glass bowl
- Chopping board and sharp knife
- Freezer & refrigerator
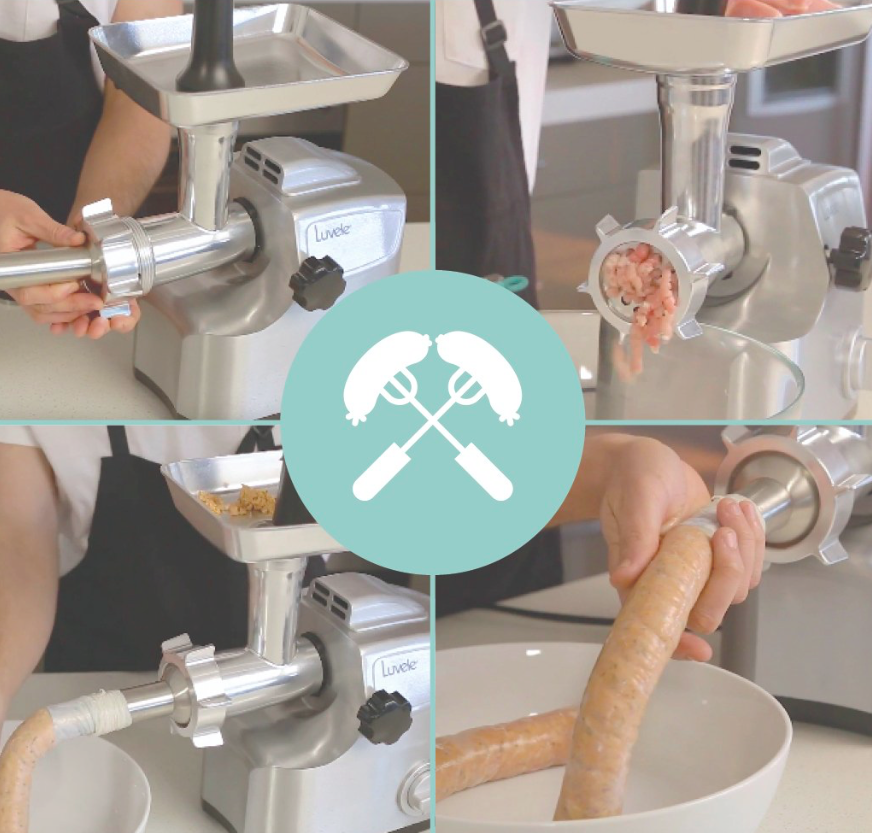
SET UP
Set up the meat grinder on a bench or secure flat surface, fit the medium blade and place a bowl under the fixing ring for collecting the mince.
PREPARATION CHILLED
It’s very important that all the ingredients are very cold. I can’t stress this enough. The meat and fat will behave so much better when cold. Spread the meat on a plate or pan and put it into the freezer, uncovered. Once the edges start to get hard but not frozen all the way though, it’s ready to grind. Depending on your freezer, an hour or two is sufficient.
Once you have finished grinding, place the meat back in the refrigerator while preparing for the next stage. Make sure that the temperature of the sausage meat never exceeds 10°C (40°F)
THE TYPE OF MEAT
Don’t let anyone tell you that you need prime cuts to make amazing tasting sausages. Quality absolutely matters in regard to the health and wellbeing of the animal and organic matters too, but the meat need only be secondary-cuts. Remember, the fundamental reason for the sausage was to use up the remains of the carcass so nothing would be wasted. It’s a good philosophy to stick by since you are grinding up the meat anyway and some of the tastiest parts of the animal are away from the large muscle meats. Tell your butcher what you’re making and I’m sure they will have less expensive and tastier options for you.
Typically, pork, beef and lamb are used, but chicken or even turkey meats can be made into sausages. When using poultry, it’s always a good idea to grind the meat together with the skin so the texture will not be dry.
Game meat can also be used to make sausages or a combination of any of the above.
FAT
Fat plays an important part in the art of both making and cooking sausage – it’s important for the flavour and for the juiciness. You need a decent amount of fat; at least 20 percent. Without it the sausage can turn dry and will just not taste as good. Why? Because when the sausage is cooked, the fat renders (melts) and the meat actually cooks in the melted fat. This is where the flavour is.
Making sausages at home also gives you control over what fat to use. Pork fat behaves well and is always a tasty option in addition to a milder meat such as chicken or turkey that has fat with a lower melting point.
CUT THE MEAT & FAT
Cut the meat and fat into 5 cm chunks. Having small pieces of meat and fat that can easily be fed into the grinder is key. If you have to push too hard or force the meat in to the grinder it will cause friction and the meat will heat up.
GRINDING
When it comes to grinding meat, a sharp grinder is the most important thing and you really can’t beat the Luvele for cutting the fat, getting a smooth, uniform texture and making sure all the ingredients are combined.
The different grinding blades put you in control of the texture of the mince – fine and smooth or coarse, or a combination of textures (smooth with chunky pieces) can make for interesting sausages. It is common for a recipe to begin with a coarse blade then switch to a finer blade for a second run through to incorporate and emulsify the liquid and seasoning.
At the end of a grind it is normal for a portion of meat to stay inside the grinder cavity. Rather than waste it, a simple way to push it out is to feed in a slice of bread (gluten free bread if you prefer). Move the bowl away as soon as the bread begins to come out.
LIQUID
Some sort of liquid is essential and helps tighten the bind when you mix the sausage meat. This can be anything from water to fruit juice to beer, wine, vinegar or cream. It’s best to mix the seasoning and salt into the liquid before adding it to the meat; that way the seasoning is evenly distributed throughout the mix.
MIXING
As mentioned above, mixing the seasoning with the liquid is important as it helps the salt to penetrate the meat cells necessary for both texture and preservation.
Depending on the quantity of minced meat, you can mix in the seasoning in a variety of ways. For small batches, you can use a spoon or spatula. For larger batches, it is easier to get right in there and mix by hand – but wear rubber gloves because the meat is seriously cold! Take your time mixing to ensure the seasoning is well incorporated.
Don’t let the mix warm up or else the fat will change texture. If you are concerned about the fat reaching melting point, return the mix to the freezer for blast of cold! Remember, the temperature of the mince must not exceed 10°C (40°F)
CASING
Casing is the tube-like skin that holds the sausage together. It can be either natural or artificial.
Natural casings are the cleaned small intestine of an animal, usually pig, lamb or cow and are most often used to make homemade sausages. Natural animal casing is easy to find, ask your butcher. I’m sure they will be happy to sell you some that are already soaked, scrubbed, and salted. Before use, flush the casings with cold water to wash off any excess salt. Natural casings are easier to link and if curing, they shrink at the same rate as the meat as they hang to dry. Unused fresh casings can be drained, covered with salt and frozen.
Artificial casings are made from highly processed, collagen protein usually from beef or pig hides. These artificial casings are cheaper and come in convenient, uniform sizes but may only be available on-line.
SEASONING
Making your own seasoning is rewarding because you can eliminate all the nasties that are put into commercial sausage seasonings. Spices add something different to your sausage; and you can change the combination for every batch. The basic spices to start making sausages at home are: good quality salt, sugar (or your preferred sweetener – I use honey), pepper, cumin, sage, mace, coriander, fennel, ginger, paprika and garlic or garlic powder.
Always use fresh dried herbs. Note that dried herbs stay fresh for approximately 3 months. Fresh herbs can be used instead of dried herbs, although you will need to use twice as much for the same flavour. Be as creative and imaginative as you like. It’s also fun to look to other cuisines for flavour inspiration – consider Thai or curried sausages.
STUFFING
Cut the casing to manageable lengths such as 1 metre. Thread the length of casing onto the sausage making nozzle. It is tricky to start but it slides on easily once you get the hang of it.
Take the mince out of the fridge and transfer it to the hopper plate. Turn the power on and carefully push some sausage mixture through the grinder until just before it begins to come out the nozzle then stop. Turn the power off. Pull a small section of the casing off the sausage nozzle and carefully tie a knot in the end. If you tie a knot in the end before the meat has travelled through the grinder the power of motor will create air flow and blow the casing up like a balloon. (I learned the hard way!)
When the knot is tied, turn the power back on. Keep one hand cupped under the nozzle and use your thumb and forefinger to tension the casing to ensure that the casing comes off the nozzle tip gradually and not in one lump. Use the other hand to push the mince into the grinder. This will take some practise but it’s most important that you don’t go too fast at first and overfill the casing. (Again, I learned this the hard way and burst the casing several times). Slow and steady wins the race! Leave a few centimetres of casing at the end of the sausage, but do not tie off the end at this stage.
MAKING SAUSAGE LINKS
Nip the sausage between your thumb and forefinger and then rotate the sausage, alternating the rotation at each interval. You will see the wrinkled casing become taught and shiny. This will take some practise too. Finally, tie off the end and trim off any excess casing.
PATIENCE
Your sausages are made. I’m sure you are keen to sample your work! Hold tight. Some experts suggest hanging the sausages at room temperature for a while so the links can tighten in the skins. I have always skipped this step (maybe impatience) but it is important that freshly made sausages have time to ‘bloom’ – develop flavour. Cover the sausages and place in the fridge overnight. It’s not much longer to wait!
COOKING TIPS
Sausages can be cooked in many ways, including pan-frying, grilling, smoking, boiling or barbecuing, it’s really up to you. Cook the sausages on a low-to-medium heat until almost cooked through then turn up to medium-high to get the final browning. This method allows the sausages to cook evenly without the skins bursting. Don’t pierce a sausage in the pan!! The good juices and flavour will leak out and spoil the taste.
STORAGE
Since you’ve made sausage without preservative, it is best to eat them within 3 days or freeze them for another time. Homemade sausage may start to turn grey in the refrigerator but this is natural and nothing to worry about. Sausages should be stored in an airtight glass container or sealed with cling film in the refrigerator.
TASTE TEST & TAKE NOTES
Sausage making is trial and error. If you are experimenting with your own spice blend, always list the percentage of each meat used and the seasonings so you can make your favourite sausage again or adjust the taste.
SOCIALISE
The Luvele meat grinder is a simple machine to use and sausages can be made without assistance. That being said, an extra set of hands sure makes the sausage making fun. Why not make it a family activity? My kids love to make sausages. And why not, they are one of their favourite foods!
Now happy sausaging!
Beyond these tips, your ingredients are limited only by your imagination.
Other great tips and suggestions can also be found on the Luvele website here:
- SCD & GAPS COCONUT YOGURT
- CHOCOALTE & BERRY CHIA MOUSSE
- COCONUT YOGURT MADE FROM YOUNG DRINKING COCONUTS
- MOROCCAN KEFTA (KEBAB) WITH HERB YOGURT
- HOW TO MAKE L. REUTERI YOGURT
- CHEATS COCONUT YOGURT & CHOCOLATE TIRAMISU PARFAITS
- BAKED STICKY TERIYAKI STYLE CHICKEN MEATBALLS
- HOMEMADE HEMP MILK YOGURT
- HOMEMADE PEACH FRUIT LEATHER
- BEEF BURGER PATTIES GOOD ENOUGH TO MAKE IN BULK!
- COCONUT YOGURT THICKENED WITH TAPIOCA
- FESTIVE PROBIOTIC YOGURT CHEESE DOMES
- RAW MINI PECAN PIES
- PALEO SAGE & CRANB